
8.0 — End-to-end walkthrough: blank project → shipping code
On this page
8.0 — End-to-end walkthrough: blank project → shipping code
This page is the single best place to read once if you're new to VibeMap. It strings together every other section of this guide in the order you'll actually do them, with explicit "you should now see X" checkpoints so you know you're on track.
If you're already past project setup and just want the agent-handoff bit, skip to §5. Get ready to hand off.
The full flow at a glance
- Create a project and write a clear prompt.
- Generate the spec — personas, features, user stories, acceptance criteria, pages, schema.
- Run Prepare-for-Dev — generates the atomic blueprint (interactions, state machines, permissions, data contracts) and proposes a Foundation overlay set (auth, payments, email, etc.).
- Approve the Foundation overlays and review any flagged spec rows.
- Plan sprints — VibeMap topologically sorts your ACs by dependency and groups them into themed sprints.
- Provision an API key and configure the MCP server in your coding agent's IDE.
- Press play — point your agent at the project. It claims ACs in dependency order, implements them, submits for review. You watch the cards move on the Track tab.
- Review and approve the agent's work. Each approval unblocks the next AC.
- Iterate — when an AC fails, the agent picks it back up; when a sprint completes, the next one's ACs become claimable.
The web app does steps 1–6 and provides the observation surface for 7–9. The actual code-writing happens in your IDE, by your coding agent of choice, against your real repository.
1. Create a project
→ See 1.3 Creating your first project and 1.4 Writing effective prompts.
Checkpoint: you land on the project Summary page. The original prompt is captured there.
2. Generate the spec
Work top-to-bottom through the project tabs:
- Personas → 3.1 Generating personas
- Features → User Stories → Acceptance Criteria → 4.1, 4.2, 4.3
- Pages → 5.1
- Database schema → 6.1
Checkpoint: you have features grouped by persona, each with user stories, each with acceptance criteria. ACs are in draft status by default — you'll graduate them later.
3. Run Prepare-for-Dev
Open the Development tab. The Prepare sub-tab shows five pipeline cards: Interactions, State Machines, Permissions, Data Contracts, and the Foundation Proposal. Click Prepare for Development to kick them all off.
If your spec has coverage gaps (e.g. pages that don't bind to data contracts), a preflight dialog flags them with deep links. You can fix them or proceed anyway — it'll work either way, but gaps usually mean the agent has less context to work with later.
Checkpoint: all five pipeline cards complete (the dot turns green). The Foundation Proposal card opens its overlay selector.
4. Approve the Foundation and review
In the Review sub-tab, you'll see:
- Foundation proposal card — pick the overlays your project needs (auth, payments, email, ...), then approve. This generates a
kind: "bootstrap"Feature with auto-generated ACs that scaffold the runtime essentials before your feature-specific ACs land. - Any pipeline rows that need review — e.g. interactions that couldn't be auto-mapped, permissions that hit an edge case. Approve or correct.
Checkpoint: the Foundation proposal card disappears (it's hidden once approved). The Review tab's pending count drops to zero.
5. Get ready to hand off
This is where VibeMap finishes its job and your coding agent takes over. Two more steps in the web app, two more outside.
Plan your sprints

Open the Plan sub-tab. Click Plan Sprints. VibeMap:
- Runs the dependency-graph analyzer over every AC's Given/When/Then to find prerequisite edges.
- Topo-sorts all ACs in a dependency-respecting order.
- Runs a feature-cohesion compaction pass to pull stranded ACs adjacent to their feature's earliest cluster where dependencies allow.
- Asks an LLM to group the resulting linear order into themed sprints.
Checkpoint: you see a feature-by-sprint Gantt chart at the top of the Plan tab. Sprints have titles like "Auth & Sign-up", "Billing & Subscriptions". The Totals row at the bottom shows even-ish work allocation across sprints. Any feature with idle middle sprints lights up amber/rose with a "consider re-planning or marking some deps as soft" tooltip.
Full guide → Plan & sprints (developer docs).
Confirm you're ready
Open the Track sub-tab. The top of the page is a Readiness panel that shows a five-item checklist:
- ✅ Specification generated
- ✅ Foundation overlays approved (or skipped if not applicable)
- ✅ Sprints planned
- 🔑 API key for your coding agent — click the link to create one
- 🔌 MCP server configured in your IDE — click the link to copy the config
When the first three are green and you've created an API key, the panel turns into a "Ready to hand off" banner with a CTA to the MCP setup page. The fifth item stays informational (we can't verify what's in your IDE's settings file) — once you've actually configured it, you're done.
Provision an API key
Click your avatar → Account → Developer tab → Generate New Key. Name it after the agent or environment that'll use it ("claude-code-laptop", "ci-server"). Copy the key immediately — it's shown once. → 8.1 Handoff overview, section 1.
Configure the MCP server in your IDE
Click your avatar → Account → MCP tab. Pick your IDE (Claude Desktop, Cursor, Windsurf, Claude Code), paste the JSON block into your MCP config file, substitute your API key, and restart your IDE. → Connect your AI coding agent (developer docs).
Checkpoint: Claude Desktop shows the 🔨 hammer icon in its chat input. Cursor shows vibemap in its MCP servers list. If you ask the agent "List my VibeMap projects", it returns them.
6. Press play
Back in your IDE, give your agent a single instruction along the lines of:
Use the VibeMap MCP server. Get the next ready acceptance criterion from project
<project-id>, claim it, implement it in this repo, then submit it for review with a git SHA and a brief description.
Then tell it to loop — call next-ready again as soon as the previous AC is approved, and keep going until the queue is empty for the current sprint.
The agent will:
- Call
vibemap_get_next_ready_criterion→ gets the next AC whose hard prereqs are allpassed. - Call
vibemap_claim_criterion→ marks itin_progressso other agents/sessions don't pick it up. - Read the AC's spec context (Given/When/Then, related interactions, permissions, data contracts).
- Write the code in your repo, run any tests it sets up.
- Call
vibemap_submit_for_reviewwith a git SHA + a one-line description.
7. Watch it build
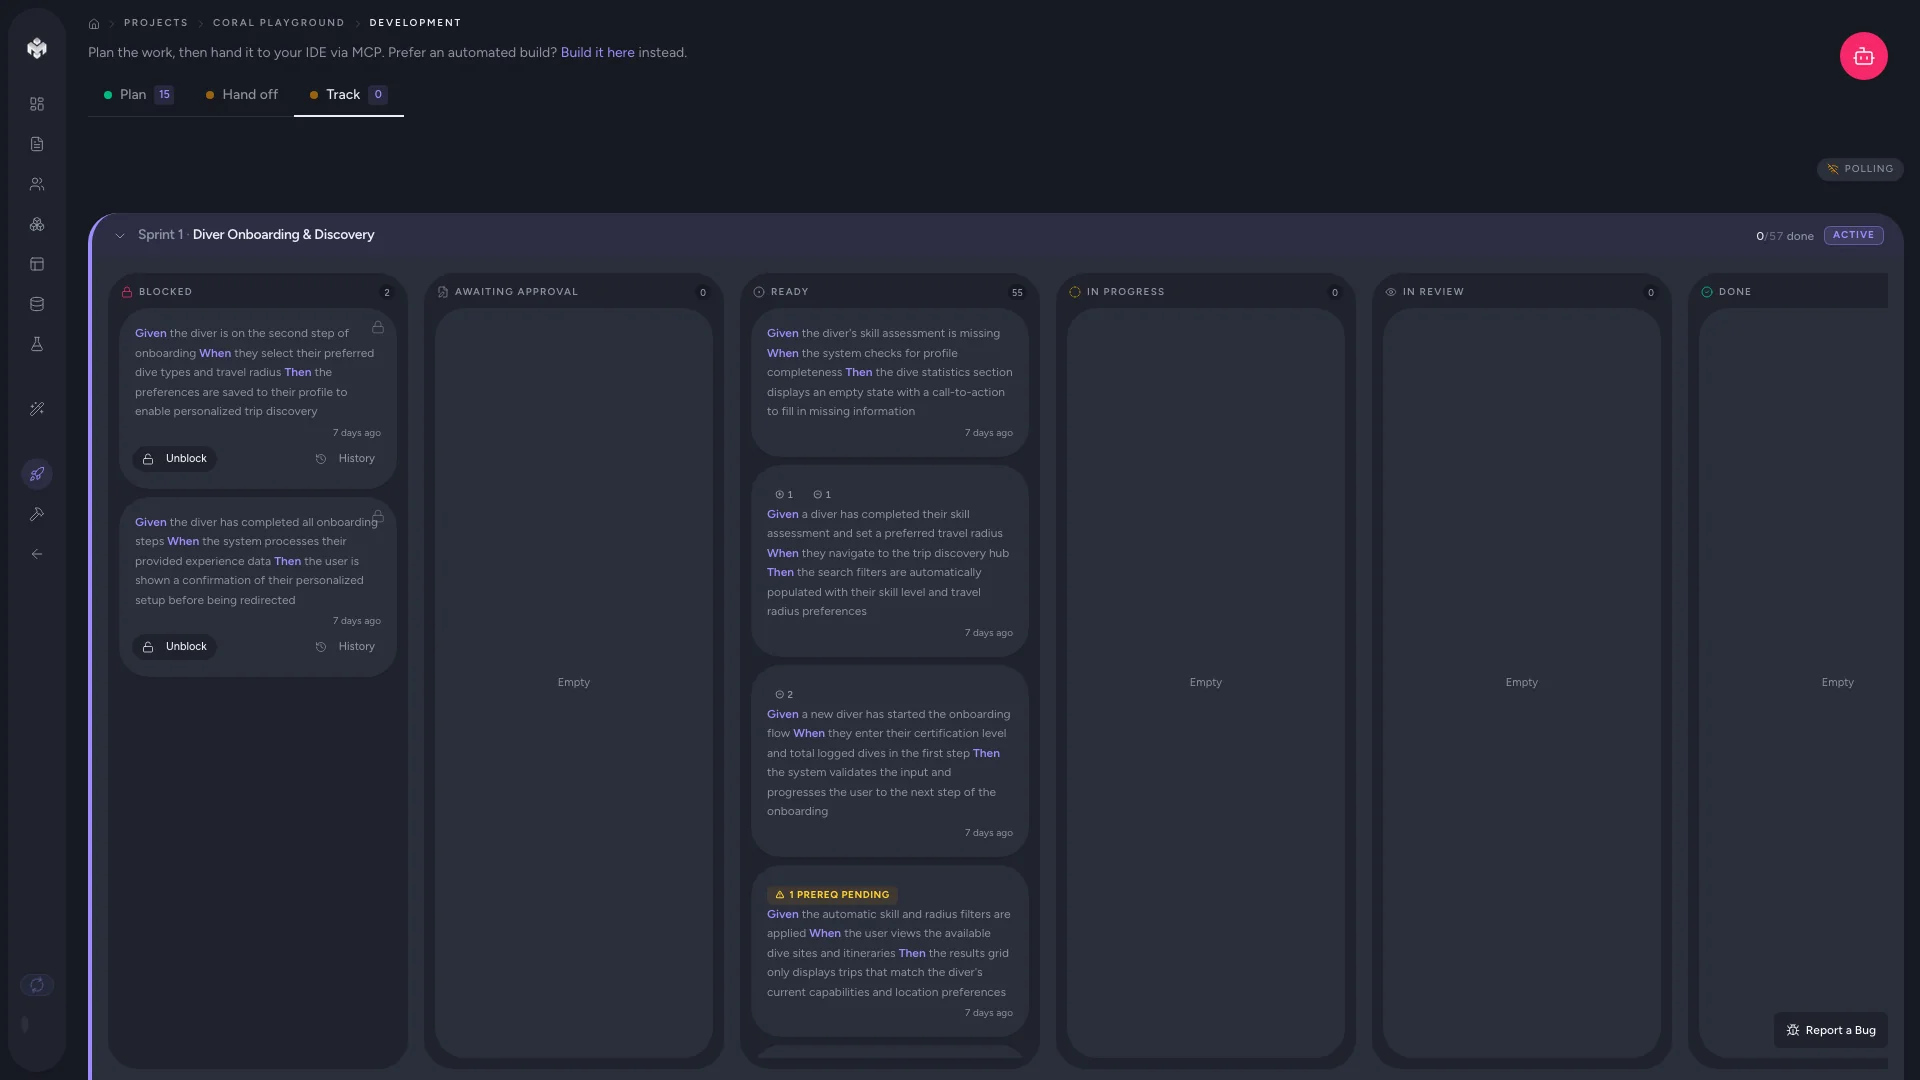
Stay on the Track sub-tab while the agent works. Three surfaces update in real time:
- Kanban board — cards move across columns (Ready → In Progress → In Review → Passed).
- Sprint sections — show progress per sprint with passed-count badges.
- Activity feed (below the kanban, click to expand) — narrative timeline of every status change with actor names and timestamps. An "X new" badge appears when events arrive while collapsed.
Checkpoint: within a minute of giving the agent its instruction, you should see a card move into "In Progress" with your agent's name beside it.
8. Review and approve
When the agent submits an AC for review, it moves to the In Review column on the kanban and appears in the Review sub-tab.
For each item:
- Pull the agent's branch / read the diff URL it submitted.
- If the code is good → Approve. The card moves to Passed, and the next AC in the dependency chain becomes claimable.
- If something's off → Reject with notes. The card flips back to Ready and the agent will pick it up on its next loop iteration.
Reviewing in batches (every 5–10 minutes, not every single AC) keeps the agent moving without you context-switching constantly.
9. Iterate
A few patterns that work well:
- Per-sprint deploy cadence. When a sprint completes, deploy a preview, smoke-test, then unblock the next sprint. Sprint boundaries are advisory for the agent (it always picks dependency-ready next) but useful for human chunking.
- Re-plan when scope changes. If you add features mid-build, re-run Plan to fold the new ACs into the dependency graph. Existing sprints get rebuilt; previously-passed work stays passed.
- Adjust hard deps. If the agent keeps blocking or sprints are fragmenting, some hard dependency edges are probably over-eager. Look at the fragmentation indicator on the Plan tab Gantt — features lit up amber/rose are candidates for review.
Where to go next
- Step-by-step IDE setup → Developer docs: 1.4 Connect your AI coding agent
- What the agent can actually do (MCP tools) → Developer docs: 5.2 MCP tools reference
- Day-to-day kanban workflow → Developer docs: 6 Kanban tracker
- Troubleshooting common issues → 8.4 Troubleshooting