6.1 — Kanban tracker: step-by-step user guide
On this page
6.1 — Kanban tracker: step-by-step user guide
A practical, walk-through-while-you-do-it guide for using the VibeMap Kanban Tracker in real life. No prior experience assumed. If you're more interested in the technical reference (state machine, API endpoints, MCP tool signatures, audit log shape), read 6.2 — API reference instead.
Audience: anyone using VibeMap to ship a project — solo builders, small teams, founders working with an AI coding assistant. Time to read end-to-end: 20 minutes. Time to do everything in here: 30–60 minutes for first-time setup, then 5 minutes per work session.
Table of contents
- What the Kanban Tracker actually does
- Before you start — the prerequisites checklist
- Pick your IDE (and why it matters)
- One-time setup (10 minutes)
- Your first work session — the full walkthrough
- Scenario A — Solo, local-only, no GitHub
- Scenario B — Using GitHub Pull Requests (manual review)
- Scenario C — Using GitHub Actions (automatic review)
- Scenario D — Returning to a project after a break
- The Web Development Tab — a tour
- Common situations and how to handle them
- FAQ
- Where to go next
1. What the Kanban Tracker actually does
Imagine a Trello-style board where each card is one tiny piece of work — a single acceptance criterion (AC) like "User can reset password via email." Cards live in columns that map to the lifecycle of that piece of work:
┌─────────┐ ┌─────────┐ ┌─────────────┐ ┌───────────┐ ┌────────┐ ┌────────┐ ┌─────────┐
│  draft  │ │  ready  │ │ in_progress │ │ in_review │ │ passed │ │ failed │ │ blocked │
└─────────┘ └─────────┘ └─────────────┘ └───────────┘ └────────┘ └────────┘ └─────────┘
Who moves a card, and when:
| Transition | Who | How |
|---|---|---|
draft → ready | You (web) | Approve the AC — the gate that says "go build it" |
ready → in_progress | Agent | vibemap_claim_criterion (atomic; a losing racer gets a 409) |
in_progress → in_review | Agent | vibemap_submit_for_review — requires a git SHA + diff URL as evidence |
in_review → passed / failed | You (web) or CI token | vibemap_resolve_review — the submitting agent cannot resolve its own work |
failed → ready | You (web) | Re-open for another attempt |
any active → blocked | Agent or you | vibemap_block_criterion — requires a category (spec_unclear / missing_dep / external_blocker / other) + reason |
blocked → prior status | Agent or you | vibemap_unblock_criterion — restores whatever status the card had when blocked |
in_progress → ready | System only | Automatic rollback when a claim goes idle for 24 hours |
The unique part: your AI coding assistant is a real participant. When Claude / Cursor / Copilot is working on something, it can move the card itself, leave notes, and submit the work for review without you having to drag anything. You see the whole story unfold in real time.
In a sentence: the tracker is the source of truth for "what's being worked on right now, by whom, and where it stands."
Why you care:
- You always know what your AI assistant is doing without having to ask it.
- Two AI sessions can't accidentally do the same work twice (the system prevents it).
- If your AI gets stuck for 24 hours, the system unsticks it for you.
- Every transition is logged with proof (commit SHA + diff link), so you can audit later.
📸 Screenshot 1 — The full kanban board. Capture the Track tab on a project with ~10 ACs spread across columns. Save as:
screenshots/01-board-overview.png.
2. Before you start — the prerequisites checklist
Tick these off in order. If any are missing, stop and fix that one before moving on — the rest won't work otherwise.
- A VibeMap account. Free plan is fine for trying it out. Sign up at vibemap.ai if you don't have one.
- A VibeMap project with features and acceptance criteria.
- Sign in to VibeMap → Projects → your project.
- In the sidebar, you should see "Features" with at least one feature listed and acceptance criteria under it.
- If you only see a project name and nothing else, click Generate Features first. This usually takes ~45 seconds.
- At least one acceptance criterion approved (
ready).- Open Features → click any feature → expand its user stories → expand the acceptance criteria.
- Each AC starts as a
draft. You need to mark itreadybefore an agent can pick it up. (We walk through how in §5 — for now just make sure features and ACs exist.)
- An IDE with MCP support installed on your computer. See §3 for options. If you have none, install Claude Desktop — it's the simplest.
- A way to edit a JSON file. Any text editor works. VS Code, TextEdit, Notepad — anything.
- (Optional, only for Scenarios B/C) A GitHub repository for your project's code.
If you're brand new and want the absolute minimum path: VibeMap account → generate one feature → install Claude Desktop → follow the rest of this guide.
3. Pick your IDE (and why it matters)
The tracker is driven from your IDE. The IDE talks to VibeMap through an "MCP server" — think of it as a small translator that lets your AI assistant call VibeMap functions like claim_criterion or submit_for_review.
| IDE | Best for | Notes |
|---|---|---|
| Claude Desktop | Trying it out, non-technical users | Lives outside your code editor. The simplest "set it up once and chat with it" option. No code editor required. |
| Claude Code | Solo developers comfortable in a terminal | CLI-based; deeply integrated with file editing. |
| Cursor | Devs already using Cursor | Per-project config; fits well if Cursor is already your daily driver. |
| Windsurf | Devs using Codeium / Windsurf | Same setup story as Cursor. |
| VS Code (Copilot) | VS Code + Copilot Chat users | Per-project .vscode/mcp.json. |
Our recommendation if you're new: start with Claude Desktop. It's the lowest friction — install the app, paste a config, restart, done. You can always add a second IDE later (the same VibeMap API key works everywhere).
📸 Screenshot 2 — Claude Desktop chat interface. A clean Claude Desktop window with the model picker visible. Save as:
screenshots/02-claude-desktop.png.
4. One-time setup (10 minutes)
You'll do this once per IDE per machine.
Step 4.1 — Generate your VibeMap API key
- Open vibemap.ai and sign in.
- Click your avatar (top right) → Settings.
- In the left sidebar, click API Keys.
- Click Create Token.
- Give it a label that tells you which machine + IDE it's for, like
Claude Desktop on MacBookorCursor on work laptop. This matters later when you have multiple keys. - Click Create. You'll see the token start with
vm_followed by a long string. - Copy it now. This is the only time it's shown in full. If you lose it, you'll need to create a new one.
📸 Screenshot 3 — API Keys page after creation, with the new token visible (blur the token characters). Save as:
screenshots/03-api-key-created.png.
Paste your token somewhere temporary (a sticky note app is fine for the next 5 minutes, then delete it).
Step 4.2 — Find your IDE's MCP config file
Open your config file in any text editor. If the file doesn't exist yet, create it.
| IDE | File path |
|---|---|
| Claude Desktop (macOS) | ~/Library/Application Support/Claude/claude_desktop_config.json |
| Claude Desktop (Windows) | %APPDATA%\Claude\claude_desktop_config.json |
| Cursor | <your project folder>/.cursor/mcp.json |
| Windsurf | <your project folder>/.windsurf/mcp.json |
| VS Code (Copilot) | <your project folder>/.vscode/mcp.json |
| Claude Code | ~/.config/claude/mcp.json (global) or <your project>/.claude/mcp.json (per-project) |
Tip for macOS users — the ~/Library folder is hidden by default. In Finder press Cmd+Shift+G and paste ~/Library/Application Support/Claude/, then press Enter.
Step 4.3 — Paste this configuration
If the file is empty, paste exactly this. If it already has content (you've configured other MCP servers), merge the vibemap block under mcpServers.
{
  "mcpServers": {
    "vibemap": {
      "command": "npx",
      "args": ["-y", "@vibemap.ai/mcp-server@latest"],
      "env": {
        "VIBEMAP_API_KEY": "vm_paste_your_token_here"
      }
    }
  }
}
Replace vm_paste_your_token_here with the actual token you copied in Step 4.1. Keep the quotes around it.
Save the file.
⚠️ Don't commit this file to git if it's inside a project folder. It contains your API key. Add
.cursor/,.windsurf/,.vscode/mcp.json, or.claude/mcp.jsonto your.gitignoreif your IDE writes to your project folder.
Step 4.4 — Restart your IDE
Fully quit the IDE (not just close the window) and reopen it. MCP config is only read on startup.
- Claude Desktop: Cmd+Q (macOS) or close from the system tray (Windows), then reopen.
- Cursor / VS Code:
File → Quit(Cmd+Q / Ctrl+Q), then reopen the project. - Claude Code: Just
exitor Ctrl+D and start a new session.
Step 4.5 — Test that the MCP server connected
In a fresh chat / session, type:
"List the VibeMap tools you have available."
You should see your AI list a few dozen tools whose names start with vibemap_, including vibemap_get_next_ready_criterion, vibemap_claim_criterion, vibemap_submit_for_review, etc. (See 5.2 — Tools reference for the full list.)
If you see no VibeMap tools listed:
- Check the IDE's "MCP servers" section (Claude Desktop: Settings → Developer → MCP Servers).
- Look for the
vibemapentry — it should say "Connected" or have a green status indicator. - If it shows an error, the most common cause is a wrong API key (re-paste it carefully) or a typo in the JSON (use jsonlint.com to check).
📸 Screenshot 4 — MCP Servers panel showing vibemap connected. Save as:
screenshots/04-mcp-connected.png.
You're done with setup. You only do this once per machine.
5. Your first work session — the full walkthrough
This is the canonical loop. Follow it exactly the first time, then deviate as you get comfortable.
5.1 — Approve at least one acceptance criterion (web)
Until at least one AC is marked ready, the agent has nothing to do. Approving is the gate that says "this AC is correct enough — go build it."
- Open VibeMap in your browser → your project → Features in the sidebar.
- Find any feature with acceptance criteria. Expand it.
- Each AC card has a status pill — newly generated ones say
draft. - Click the AC, review the wording, and click Approve (or whatever the button is labelled in the current UI — look for the action that moves it to
ready).
📸 Screenshot 5 — A feature expanded, showing 3 ACs with status pills. One being clicked to approve. Save as:
screenshots/05-approve-ac.png.
Approve 2–3 ACs to give the agent some choices. You can always approve more later.
5.2 — Open the Development tab and confirm
In the same browser tab, click Development in the project sidebar. You'll see three tabs: Plan, Hand off, Track. (The Prepare workflow lives on its own Prepare page now — see §10.)
Click Track. You should see your approved ACs as cards in the ready column.
📸 Screenshot 6 — Track tab with 3 cards in the "ready" column. Save as:
screenshots/06-ready-cards.png.
If the column is empty, your approval didn't take. Refresh the page; if still empty, the AC is probably still in draft.
5.3 — Switch to your IDE and ask the agent to start
Open your IDE (Claude Desktop, Cursor, etc.). Make sure it's connected to your project's code if relevant — for Claude Desktop this means just having the chat open; for Cursor it means having the project folder open.
Type this prompt (you can paste it):
"Pick up the next ready acceptance criterion from VibeMap project
<your-project-id>and implement it. Claim it first so no one else takes it. Show me what you find before writing code."
To find your project ID: in the browser, look at the URL while on the Development tab. It's the long string after /project/. Example: in https://vibemap.ai/project/8a3f7b2c-…/development, the ID is 8a3f7b2c-….
💡 Tip: Save your project ID somewhere — every prompt to your AI assistant about VibeMap needs it.
The agent will:
- Call
vibemap_get_next_ready_criterionand tell you which AC it found. - Call
vibemap_claim_criterionto lock it. - Show you the AC's title and description.
5.4 — Watch the board update in real time
Go back to your browser. The card you just claimed should have moved from ready to in_progress within a second or two. If it didn't, refresh — the realtime channel is best-effort.
📸 Screenshot 7 — Board with a card in
in_progressand the connection indicator showing "Live" (green Wi-Fi icon top right). Save as:screenshots/07-in-progress.png.
You can also click the card to see its event timeline — the audit log of every transition with timestamps and who did what.
5.5 — Let the agent implement the work
Tell the agent:
"Now implement the AC. Make any code changes you need."
While it works, you can optionally ask:
"Send a progress note to VibeMap saying you're halfway through and the X part is the trickiest."
That call goes to vibemap_report_progress and shows up in the timeline as a yellow note. It does NOT change status — it's just for visibility.
5.6 — Submit for review
Once the agent thinks it's done, ask:
"Submit this for review. The git SHA is the most recent commit on this branch and the diff URL is the PR link (or, if I haven't pushed yet, generate a placeholder)."
The agent will call vibemap_submit_for_review(criterionId, gitSha, diffUrl, notes?). The card moves from in_progress → in_review.
What if you haven't pushed code anywhere? You have two options:
- Push to GitHub (even a draft PR works; see Scenario B).
- Use a placeholder. For local-only experiments, the agent can pass a fake SHA (e.g., the first 7 characters of any hash) and a placeholder URL like
https://gist.github.com/…orhttps://example.com/local-experiment. The audit log accepts these — it's just metadata. See Scenario A.
5.7 — Resolve the review
You — a human — must click "Pass" or "Send back" on the web. Agents cannot pass their own work (this is enforced server-side, not just convention).
- Back in the browser, the card is now in the
in_reviewcolumn. - Click the card → review the diff (open the diff URL the agent submitted) → click Pass if it's good, or Send back if it needs rework.
- Pass → card moves to
passed(terminal — no further changes possible). - Send back → card moves to
failed, then becomesreadyagain so the agent (or another agent) can take another swing.
📸 Screenshot 8 — Card in in_review with "Pass" / "Send back" actions visible. Save as:
screenshots/08-resolve-review.png.
That's the full loop. Most users do one AC at a time and repeat.
6. Scenario A — Solo, local-only, no GitHub
You're hacking on your own project on your laptop. You don't push to GitHub yet — maybe you're prototyping, maybe the project isn't shared. The tracker still works fine; you just need to give it placeholder evidence.
Setup differences
Same as §4. Nothing GitHub-specific needed.
Daily loop
- Approve ACs in the web (§5.1).
- Tell your agent in your IDE:
"Take the next ready AC from project
<id>, claim it, and implement it. Don't push anywhere — this is local. Use a placeholder git SHA (local-plus the first 7 chars of a hash of the diff) andhttps://example.com/local/<my-name>as the diff URL." - The agent works, then submits with the placeholder.
- You manually review the changes (look at the files, run them, test the behaviour).
- You click Pass on the web.
That's it. The git SHA and diff URL are required by the API as discipline, but the system accepts any string for local-only work.
What you give up by skipping GitHub
- No CI auto-resolution (you'll always click Pass / Send back manually). Fine for solo work.
- No PR review interface. You're the only reviewer anyway, so this doesn't matter.
- The audit log is less useful as long-term evidence (you can't click the diff URL six months later to see what changed). For a personal project, this is usually OK.
When to graduate to GitHub
Once you start showing your work to anyone else (collaborators, code reviewers, your future self in 6 months), move to Scenario B.
7. Scenario B — Using GitHub Pull Requests (manual review)
You push your code to a GitHub repo. Each AC's implementation lands as a PR. You (or a teammate) reads the PR, then clicks Pass / Send back on VibeMap.
Setup differences
- GitHub repo for your project's code. It doesn't need to be linked to VibeMap — VibeMap just stores the PR URLs as evidence.
- Optional: a branch naming convention. We recommend
ac/<short-id>-<slug>likeac/abc123-password-resetso it's easy to see which branch maps to which AC.
Daily loop
- Approve ACs in the web.
- In your IDE:
"Take the next ready AC from project
<id>, claim it. Create a new branchac/<short-id>. Implement the AC. Commit with messagefeat(<area>): <ac title> (AC-<id>). Push the branch. Open a draft PR against main." - The agent works, pushes, opens the PR, then submits to VibeMap with the real commit SHA and PR URL.
- You read the PR on GitHub.
- You click Pass or Send back on the VibeMap web.
If you click Pass, you can then merge the PR on GitHub at your leisure — the two systems are independent. If you click Send back, the AC reopens; the agent (in the same or future session) can push more commits to the same branch.
Recommended commit/PR title convention
To make it easy for future-you (or CI in Scenario C) to find which commit relates to which AC:
Branch:        ac/abc-123-password-reset
Commit:        feat(auth): user can reset password via email (AC-abc-123)
PR title:      [AC-abc-123] Password reset flow
The (AC-abc-123) substring at the end of the commit message is what CI greps for in Scenario C.
📸 Screenshot 9 — A GitHub PR with the AC ID in the title, and the corresponding VibeMap card showing the same SHA in its timeline. Save as:
screenshots/09-pr-with-ac-id.png.
8. Scenario C — Using GitHub Actions (automatic review)
Same as Scenario B, but you wire GitHub Actions to call VibeMap's resolve_review endpoint when your tests pass. No human click needed for routine, well-tested work.
Setup differences
8.1 — Issue a CI-scoped API token
Different from your IDE's API key. The CI token can ONLY resolve reviews — it can't claim work or change the spec. If it leaks, the worst-case is "tests can be marked passed/failed maliciously," which is a much smaller blast radius than your personal token.
- VibeMap → Settings → API Keys → Create Token.
- Choose scope CI / Test Resolution (or whatever the UI labels it).
- Copy the token.
- In your GitHub repo: Settings → Secrets and variables → Actions → New repository secret.
- Name:
VIBEMAP_CI_TOKEN. Value: paste the token. Save.
8.2 — Add a workflow file
Create .github/workflows/resolve-vibemap-review.yml:
name: Resolve VibeMap reviews
on:
  workflow_run:
    workflows: ["Tests"]   # ← name of YOUR existing test workflow
    types: [completed]

jobs:
  resolve:
    runs-on: ubuntu-latest
    steps:
      - uses: actions/checkout@v4

      - name: Map commit SHA to AC IDs
        id: map
        run: |
          AC_IDS=$(git log -1 --pretty=%B | grep -oE 'AC-[a-z0-9-]+' | tr '\n' ' ')
          echo "ac_ids=$AC_IDS" >> "$GITHUB_OUTPUT"

      - name: Resolve as passed (or failed)
        env:
          VIBEMAP_CI_TOKEN: ${{ secrets.VIBEMAP_CI_TOKEN }}
          OUTCOME: ${{ github.event.workflow_run.conclusion == 'success' && 'passed' || 'failed' }}
        run: |
          for ac in ${{ steps.map.outputs.ac_ids }}; do
            curl -X POST "https://vibemap.ai/api/mcp/kanban/criterion/${ac#AC-}/resolve-review" \
              -H "Authorization: Bearer $VIBEMAP_CI_TOKEN" \
              -H "Content-Type: application/json" \
              -d "{\"outcome\":\"$OUTCOME\",\"test_run_url\":\"${{ github.event.workflow_run.html_url }}\"}"
          done
This workflow runs after your Tests workflow completes. It greps the latest commit message for any AC-<id> substrings, and POSTs the test outcome to each. Replace "Tests" with your actual test workflow name.
8.3 — Adopt the commit-message convention
Same as Scenario B's convention, with the (AC-abc-123) suffix in commit messages. Without it, the CI workflow has no way to know which AC a commit belongs to.
8.4 — Test the loop end-to-end
- Approve an AC.
- Have the agent implement, push to a branch with the AC ID in the commit message.
- Open a PR. Your tests run.
- When the test workflow completes, the resolve workflow runs.
- The AC should auto-move to
passed(orfailedif tests failed).
What if tests pass but the AC is wrong?
CI passing means "the tests didn't break," not "the implementation is what you wanted." For high-stakes ACs, you may still want manual review even with CI on. You can:
- Skip the convention (don't put
(AC-id)in the commit) and resolve manually for that AC. - Or always resolve manually for ACs in a particular feature (judgment call per project).
CI auto-resolution is best for the high-volume, well-tested grunt work. Save manual review for design-sensitive changes.
9. Scenario D — Returning to a project after a break
You haven't touched the project in a week (or a month). Here's how to pick up cleanly.
9.1 — See what state things are in
- Open VibeMap → your project → Development tab → Track.
- Look at each column:
in_progress— anything here? If so, did you (or your agent) leave something half-finished, or did the system auto-revert it back toready? Click the card → check the timeline → see who last touched it and when.in_review— anything waiting for your decision? Click → look at the diff URL → Pass or Send back.blocked— anything that needs unblocking? Click → read the reason → fix the underlying issue → click Unblock.
- The header shows counts: TRACKER · 24 CRITERIA. The board is the whole Development page now — there are no tabs; the ⓘ Handoff Instructions button (top-right, next to the Category filter) opens your MCP connection details, and sprint planning lives on its own Sprint Planning page under Prepare.
9.2 — If your agent left work in in_progress and disappeared
The system handles this for you. After 24 hours of no activity on an in_progress card, an automatic background job reverts it to ready. So if you check after a week, anything truly abandoned is already back in the queue.
You can verify by clicking the card → timeline → look for an entry like:
auto_revert · system:auto-revert · { idle_hours: 24 } · Mon May 10 03:00 UTC
That's the system reclaiming a stuck card.
9.3 — If your agent submitted but you never reviewed
Cards in in_review for >7 days emit a metric (kanban.long_blocked in PostHog) but don't auto-resolve. You always own the click.
9.4 — Restart the work loop
Same as §5 — open your IDE, ask the agent to take the next ready AC, off you go.
10. The Web Development page — a tour
The Development page in the project sidebar (labelled Hand off to IDE) is the home for handing your spec to an IDE. It's a single full-page kanban board — there are no tabs. Planning and connection details each moved to their own place, described below.
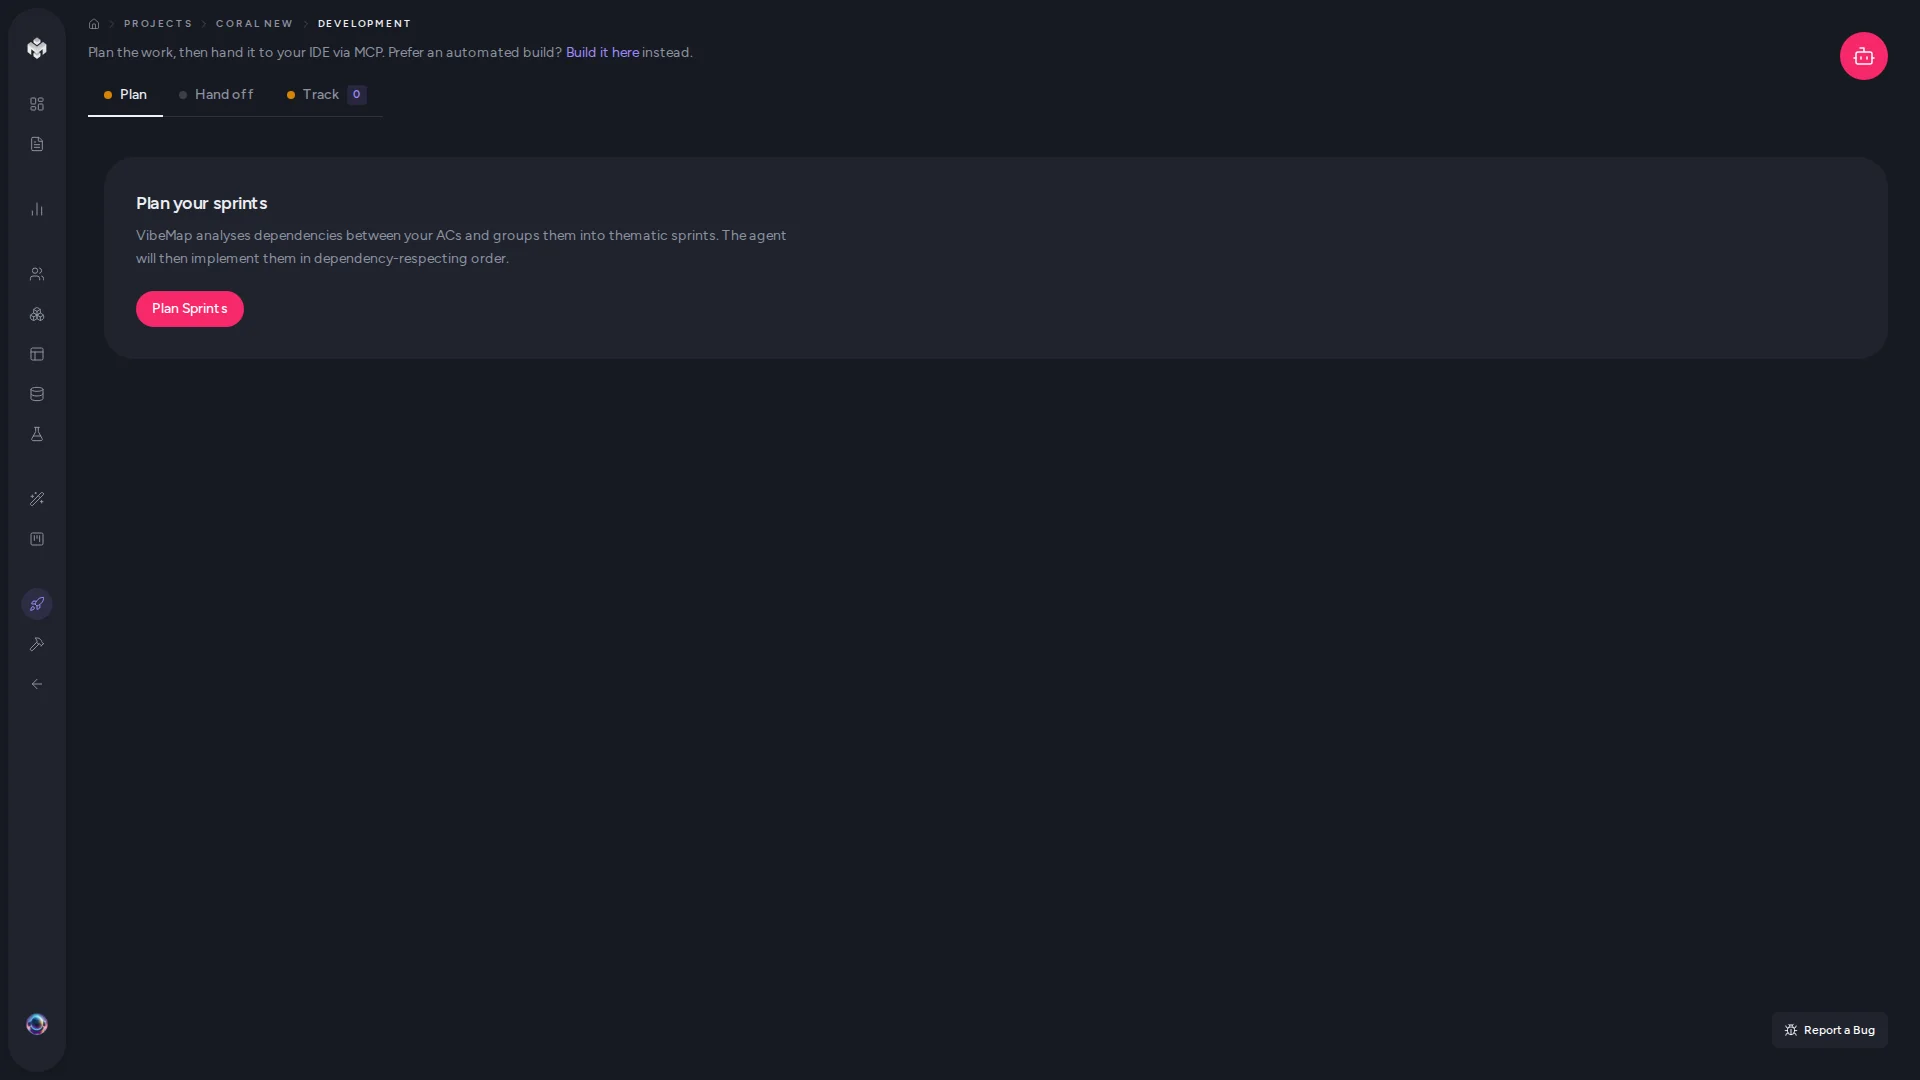 Figure: The Development page.
Where did Plan, Prepare, and Review go? Sprint planning is now its own Sprint Planning page under Prepare in the sidebar. The Prepare workflow is a linear workspace built around the Blueprint Preview Map: running Prepare for Development there kicks off four parallel LLM pipelines (Interactions, State Machines, Permissions, Data Contracts) after a spec-coverage pre-step, and anything the LLM flagged as uncertain is reviewed on that page too (the old Review tab's inbox). You don't need Prepare to use the tracker — but running it makes the atomic blueprint your agent reads much richer.
Sprint Planning (its own page)
The sprint planner: analyze dependencies between your ACs and group them into thematic, dependency-respecting sprints. It used to be the Development page's Plan tab; it's now the standalone Sprint Planning page. Covered in full in 7 — Plan & sprints.
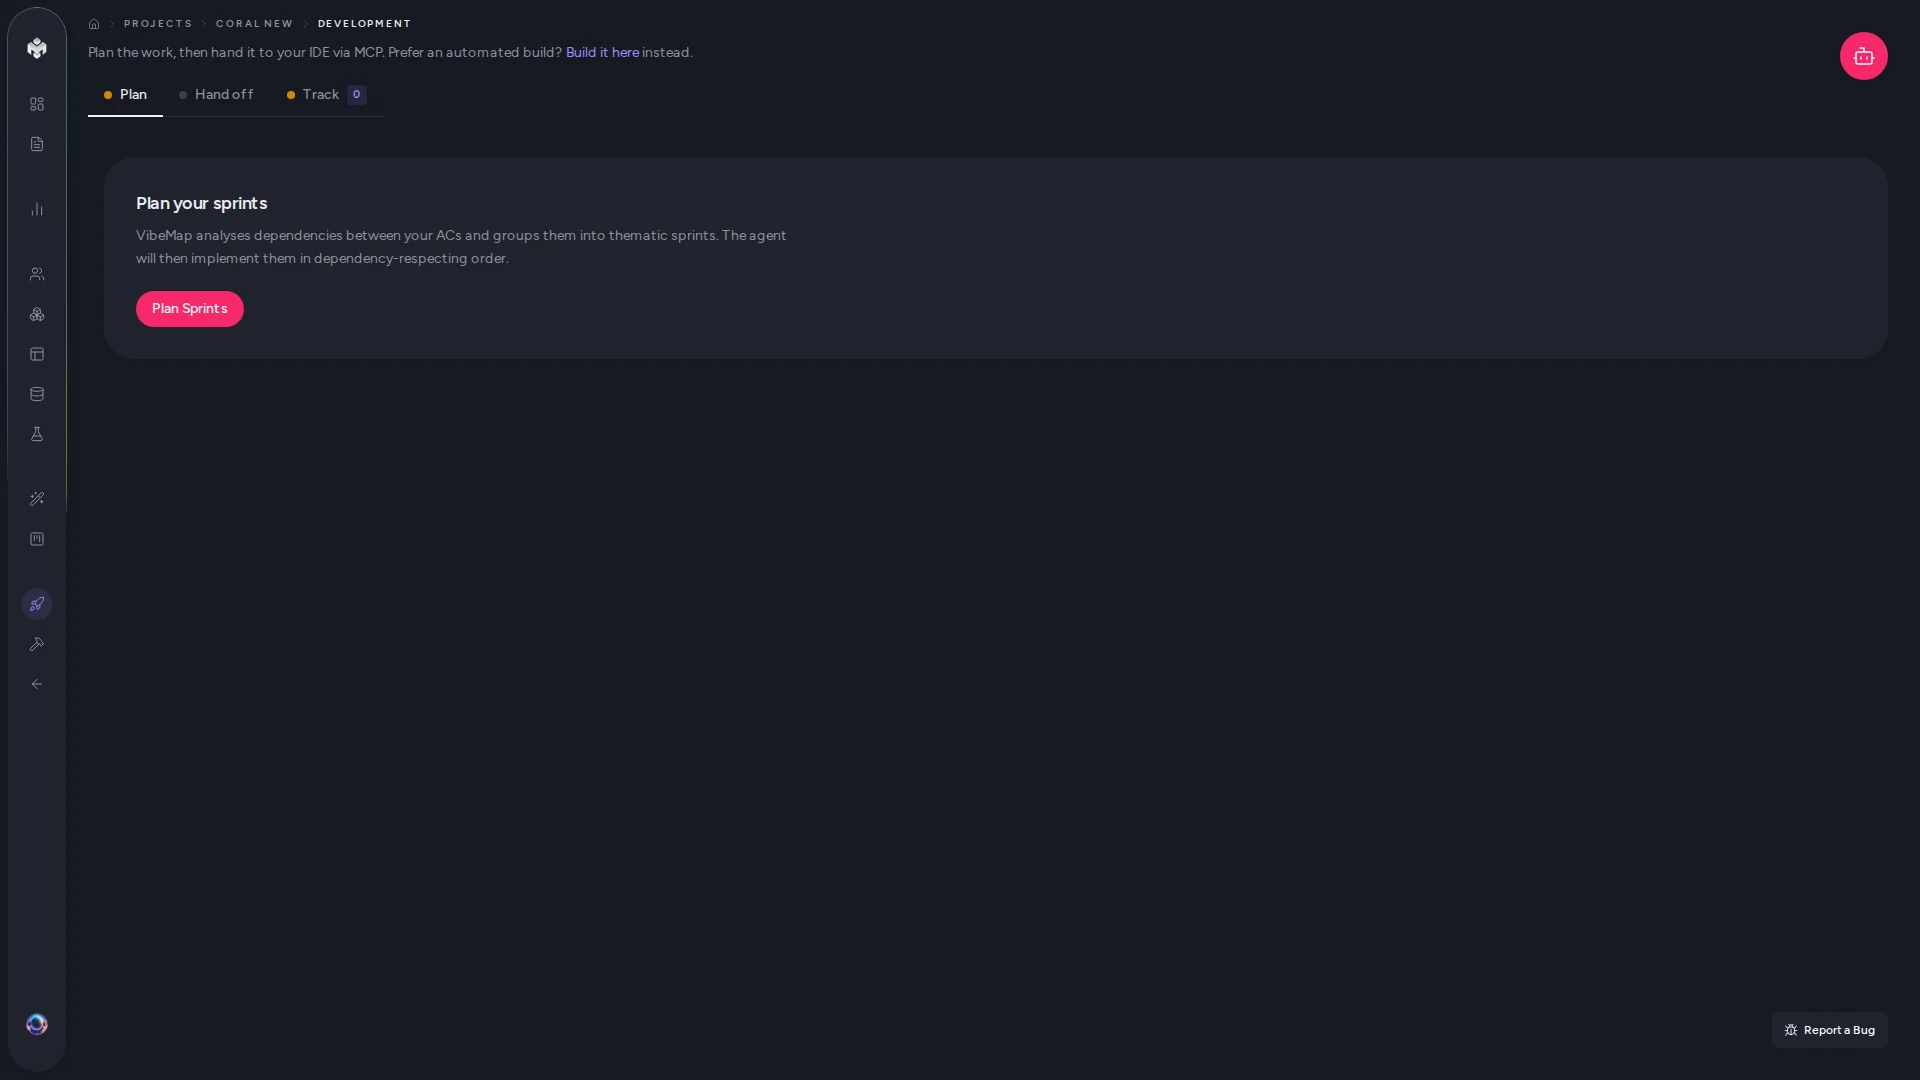 Figure: The Sprint Planning page.
The Handoff Instructions panel
Click the ⓘ Handoff Instructions button (top-right of the board, next to the Category filter) to open the Hand off to your IDE panel with everything your agent needs to connect:
- API key — create/manage the
vm_personal access token your agent authenticates with (links to account settings — keys are account-level, not per-project). - MCP config — the copy-paste config block for your IDE (the same one from §4).
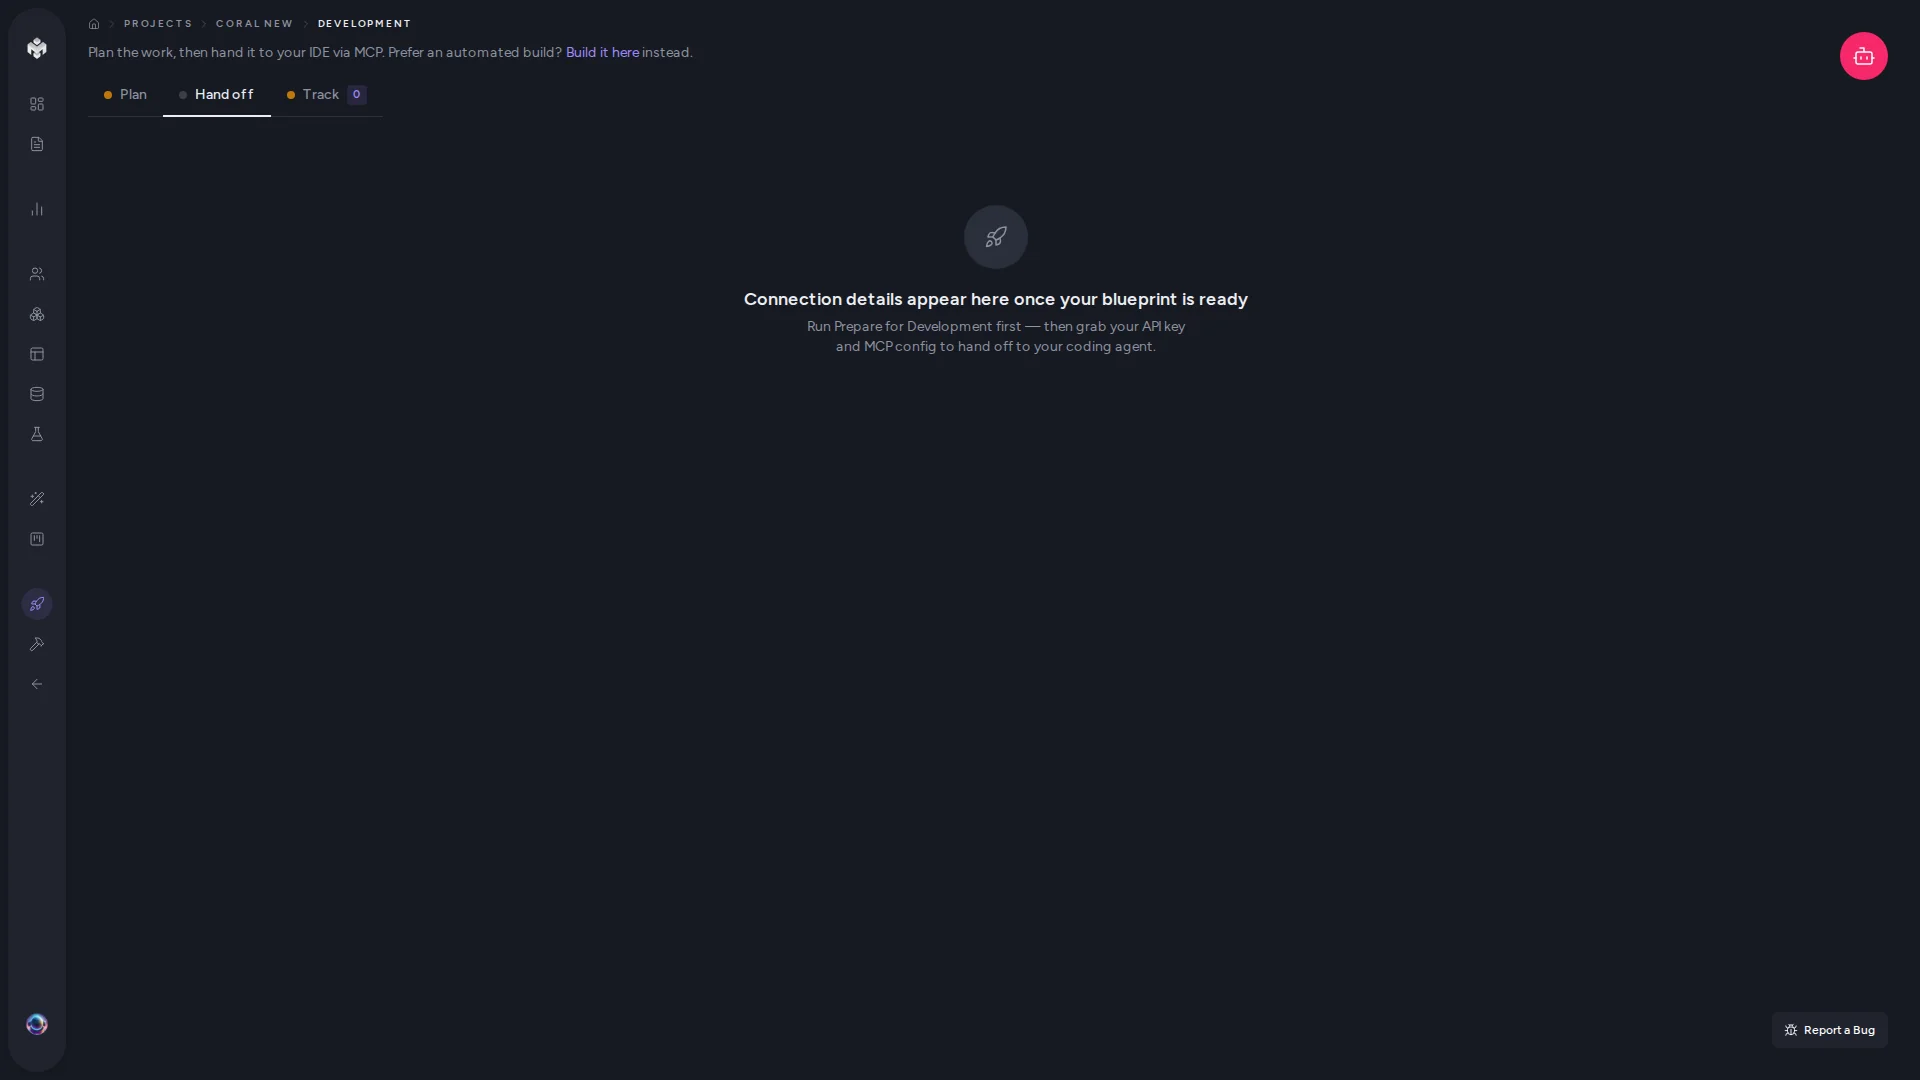 Figure: The Handoff Instructions panel.
The board
The kanban board fills the page, with a live activity feed of recent transitions below it. This is where the daily work happens. See §5.4 for what to expect.
Above the columns:
- Project name + AC count ("MY APP · 47 CRITERIA").
- Connection indicator (green Wi-Fi = realtime updates active; amber = polling fallback every 5s).
- Search and filter bar — narrow down to a feature, a status, or a free-text match.
Each card shows:
- AC title
- Feature / story it belongs to
- Current actor (if claimed)
- Last event timestamp
Click a card to open its event timeline (the full audit log).
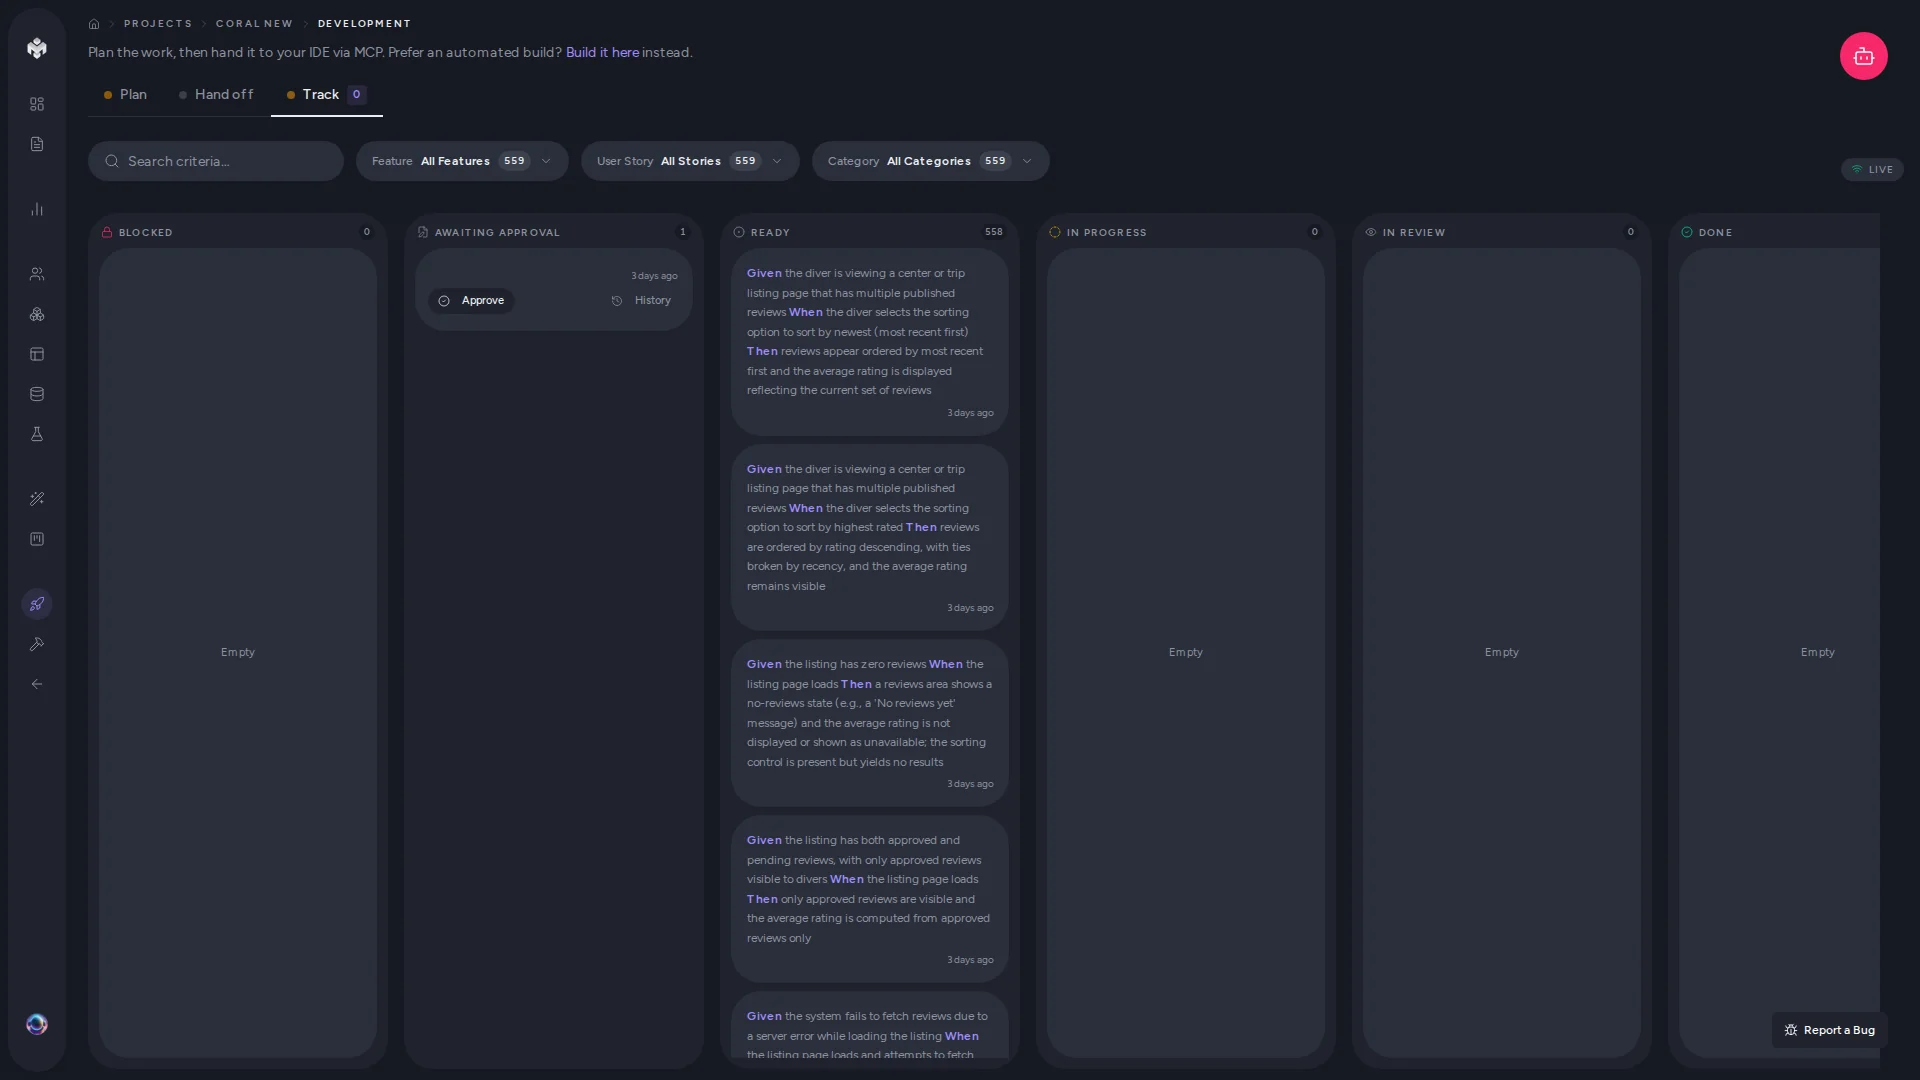 Figure: The Development board — the live kanban.
11. Common situations and how to handle them
"I claimed something then changed my mind."
Easy. Tell your agent (or click in the web): block the AC with reason other and message "Reconsidering scope, releasing for now." Then immediately unblock — the AC restores to ready (its prior state was in_progress, but unblock accepts a restore_to if you want to override).
Alternative: just walk away for 24 hours and the system auto-reverts.
"The agent submitted but the work is wrong."
Click Send back on the in_review card. The card moves to failed, then becomes ready again. The next session (yours or another) can pick it up. The original commit SHA stays in the audit log so you can see history.
"I'm blocked on something external (vendor API down, missing access, etc)."
Tell your agent:
"Block AC
<id>with categoryexternal_blockerand reason 'Stripe webhook test mode is failing — waiting on vendor support'."
The agent calls vibemap_block_criterion. Card moves to blocked column. When the vendor responds, tell your agent to unblock with a resolution note.
You can also block from the web (when that UI ships) or via the HTTP endpoint directly:
# In your browser dev console while signed in to vibemap.ai
fetch('/api/mcp/kanban/criterion/' + acId + '/block', {
  method: 'POST',
  headers: { 'Content-Type': 'application/json' },
  body: JSON.stringify({ category: 'external_blocker', reason: 'Stripe webhooks down' }),
}).then(r => r.json()).then(console.log)
"I forget what I was working on."
Open Track tab. Sort by "Last updated." The most recent in_progress cards are likely yours. Click → timeline shows what your agent last reported.
Or in your IDE:
"List all VibeMap kanban events from the last 24 hours for project
<id>."
"Two of my IDE windows tried to claim the same thing and one failed."
That's the atomic-claim guarantee at work. The first one to call claim_criterion wins; the second gets a 409 race error. Just ask the second agent to call vibemap_get_next_ready_criterion again — it'll find a different AC.
"My CI marked it passed but I disagree."
passed is terminal — by design, you can't unmark it. Two paths:
- Edit the AC content in the Features view. Mark a new draft. Approve it. The new AC becomes a fresh card. Treat the old
passedAC as historical. - Open a follow-up AC describing the rework needed. Approve it. Treat the original as "done as specified, but the spec was wrong."
This intentional friction prevents history rewriting. Audit logs stay trustworthy.
"The agent error says agents_cannot_self_resolve."
By design — agents cannot pass their own work. Either:
- A human clicks Pass on the web (Scenarios A, B), or
- A CI runner with a
ci_review-scoped token resolves automatically (Scenario C).
If you really want fully-autonomous loops, set up Scenario C with a real test suite as the gate.
"The diff URL the agent submitted points at a private gist nobody can see."
Re-submit. Tell the agent:
"Send back AC
<id>(call resolve_review with outcome=failed and notes 'diff URL was a private gist — re-submit with a public PR'). Then re-submit it pointing at the actual GitHub PR."
For solo work, gists are fine. For shared work, use real PR URLs.
"I want to see what my agent did across all my projects today."
Use the events HTTP endpoint:
curl "https://vibemap.ai/api/mcp/kanban/projects/<project-id>/events?since=$(date -u -v-1d +%Y-%m-%dT%H:%M:%SZ)" \
  -H "Authorization: Bearer $YOUR_TOKEN"
Or just look at the timeline of each card in the Track tab.
12. FAQ
Q: Do I have to use AI to use the tracker? No. You can manually approve, claim (via the web or HTTP endpoint), and resolve cards yourself. The tracker is just a workflow board — the AI integration is the useful part, but not required.
Q: What if I don't have a VibeMap-generated project? Can I import an existing codebase?
Not into the kanban tracker directly. The tracker tracks acceptance criteria, which come from VibeMap's feature generation. If you have an existing codebase you want to map to VibeMap, the workflow is: describe your existing app to VibeMap → it generates features and ACs → you mark which ones already exist as passed (we don't currently support this in one click — you'd need a script that hits the resolve endpoint with outcome: passed for each).
Q: Is the tracker going to charge me? The tracker itself is included in all plans. The MCP tools that drive it count against your plan's MCP quota (Pro+ for atomic blueprint pipelines like Prepare for Development). Free plan users can still claim, submit, and resolve — they just can't run Prepare.
Q: Can my team see my kanban board?
Anyone with project access (a member of the project in VibeMap) can see the same board. The Row Level Security on kanban_events enforces this server-side — non-members can't even subscribe to the realtime channel.
Q: What happens if VibeMap goes down while I'm working? The agent's calls will fail with network errors. Your local code is fine — nothing about your codebase depends on VibeMap being up. Once VibeMap is back, just ask the agent to retry the last action (claim, submit, etc.). The board catches up via the audit log.
Q: Can I delete cards? You can't delete events from the audit log (it's immutable by design). You can delete acceptance criteria from the Features view; doing so deletes the AC card from the board too.
Q: My commit message convention is different from (AC-abc-123). Can I customize it?
The submit_for_review MCP tool only requires the SHA — no convention needed. The convention is for CI in Scenario C to know which AC to resolve. If you write your own CI workflow, you can grep for any pattern you like.
Q: I want to use this without a UI at all. Is that possible? Yes. Everything the web UI does is also exposed as an HTTP endpoint (see 6.2 — API reference § HTTP API). You can drive the entire workflow from a script or a custom UI. The web Track tab is just one consumer.
Q: Is the data backed up? What happens if my account is deleted? Your data is stored on managed Postgres with daily backups. If you delete your account, your projects (including kanban events) are deleted within 30 days per our data policy. Export your project before deletion if you need a copy.
13. Where to go next
- 6.2 — API reference — when you want the technical details: state machine, MCP tool signatures, HTTP API, audit log schema, real-time subscription.
- 5.1 — MCP server overview — the broader MCP integration (non-kanban tools too).
- 5.2 — Tools reference — every MCP tool, including the non-kanban ones.
- 4.1 — API overview — general API conventions if you want to build your own integration.
- 7 — Plan & sprints — group ACs into themed sprints (Pro+).
If you hit something this guide doesn't cover, the Common situations section is the catch-all. If you find a real gap, please open an issue or send feedback through the in-app form.
📸 Screenshot inventory. This guide references 9 screenshots that should be captured and saved to
docs/developer-docs/6-kanban-tracker/screenshots/. They're numbered and described next to each placeholder above. (§10 uses the live app screenshots already published underpublic/screenshots/development/.) A capture session with one well-set-up project should take ~30 minutes.